Sitecore Installation

What is Sitecore?
Sitecore is a leading digital experience software used by organisations globally to create seamless, personalised digital experiences. Sitecore is an integrated platform powered by .net CMS, commerce and digital marketing tools. Sitecore’s key product is the Sitecore Experience Platform (XP) which combines their powerful content management system (CMS) Sitecore Experience Manager and Sitecore Experience Database (xDB).
Sitecore is constantly evolving, with each update offering new innovative tools for its users. The cloud-first digital experience platform also offers shopping experiences through Sitecore Experience Commerce. The question, ‘what is sitecore?’ is a common one, and understandably as it’s often described as a web content management platform. Gartner rated Sitecore highly in their Gartner Magic Quadrant 2017 and have gone on to recognise the software more recently. So which is it? Is Sitecore a CMS, an xDB or more?
Sitecore CMS
Market-leading content management with customer experience tools built right in
If you’re completely new to the platform, understanding Sitecore as a Content Management System (CMS) is a good place to start. We’ll help you get to grips with the platform and its features. So, you can decide what you want to get out of Sitecore and how it will help your business.
What is the Sitecore CMS?
Sitecore CMS is a platform for enterprise-level businesses that’s been built on Microsoft’s .NET framework. Which means it inherits a level of reliability, flexibility and stability Microsoft technology is known for.
The platform offers users a system for managing all of your business’ digital content centrally. Not just for your Sitecore website, but for any mobile sites, microsites, apps and other digital engagement channels. And despite its enterprise-level scalability, Sitecore’s extremely user-friendly. So, your content editors and marketers can have full control over website content – rather than needing help from developers.
Other big benefits of Sitecore include:
Central content management and a single media library – helping you keep track of all your digital content in one place, to be deployed quickly and easily anywhere within your Sitecore solution.
Intuitive, user-friendly interface – it’s not only simple to use, but the Sitecore content editor will feel very familiar to Microsoft users.
Mobile-friendly page layouts – see exactly how your web page will look on various mobile devices with customisable mobile layouts, so you target mobile visitors with specific content.
Personalisation in real-time – set up personalisation rules directly from the Page Editor and Sitecore will present unique, engaging content to users in real time.
Seamless integration with other systems – there’s no need to ditch your current customer database or e-commerce software, Sitecore lets you integrate your systems into one solution and manage everything centrally.
Sitecore now more commonly refers to the platform as a Customer Experience Platform (CXP). This is because of the developments in recent versions which have helped businesses focus on their customer experience offering as a whole, not just their website content. Even though content management is still a key part of Sitecore CMS,
Why choose Sitecore CMS over other platforms?
Sitecore’s consistently been rated highly in the Gartner Magic Quadrant. This annual, impartial report is a valuable and trusted resource for enterprise-level businesses looking to find the right platform. And since 2010, Sitecore has come out in the ‘Leader’ quadrant every year.
In the 2016 Magic Quadrant report, Gartner noted Sitecore’s strengths as, an “industry-leading” vision for contextual delivery and “360-degree view of the customer”, as well as incorporation of the latest digital marketing trends and development innovations.
We could talk about why you should choose Sitecore all day long. But instead of taking our word for it, why not let us give you a Sitecore Demo? See for yourself all the easy-to-use features the platform has to offer.
Customer experience platform
How to use a customer experience platform for contextual marketing
What is a customer experience platform?
A customer experience platform is a platform for managing the customer engagement functions of your website. They combine traditional content management system (CMS) functionality with customer experience management (CXM) capabilities. Giving marketers analytics, content personalisation, marketing automation, data storage and A/B testing.
Customers expect to be able to engage with brands across multiple channels. Which include email, social media, phone or website visits. Plus, they expect these engagements to be seamless. A powerful customer experience platform will include various tools and functions needed to meet your customers’ expectations and reach key business goals.
Creating a great customer experience has many benefits:
Increased engagement
Improved conversion rates
Greater customer loyalty
Improved brand perception
Why big brands need a great customer experience platform
With the right customer experience platform, you can build great customer experiences quicker and easier. Using a single platform across your business improves communication between departments and helps keep the brand consistent across your digital channels. With every department working towards the same goals, you can only reach them faster. Talk about music to your stakeholders’ ears!
A survey by Econsultancy and Adobe found that 38% of businesses consider a cross-team approach to customer experience was most important to success. And 47% considered a cohesive digital strategy built around the customer experience was most important. These are almost impossible to achieve using disconnected systems and without a company-wide customer experience focus.
A connected customer experience platform lets you create, manage and measure every digital engagement between your brand and your customers. Your campaigns and the data they collect are synchronised across every channel. The rich individual customer data collected is vital. Its gives you a single view of each individual customer. And opens the gateway to powerful real time personalisation.
With that kind of personalisation at your fingertips, you can deliver unique customer experiences. Plus, you can better automate some of your marketing campaigns. Marketing automation is key to really unlocking the potential of your customer experience platform. It takes a little weight off marketers’ shoulders and lets you spend your valuable time reaching business goals.
And voila! Bringing these tools together in a single platform can put contextual marketing within your reach.
What is contextual marketing?
Contextual marketing is targeted marketing that’s personalised and automated based on the user’s… well, context. It’s about delivering the right message to the right person at the right time.
So how can you achieve great contextual marketing with your customer experience platform?
A platform with “contextual intelligence” lets you engage with your customers in context to their past behaviours and their current needs. Everything from their region and device to the timing, is taken into account. In fact, considering timing may be one of the biggest advantages of a customer experience platform.
By tracking where your users are on the purchase path, you can market to them in a context that’s more relevant to their needs. So your website isn’t offering them a product summary when they’ve already picked out a colour and added it to their basket.
How Kagool get more from your customer experience platform
Our approach to enterprise website design looks at how your customer experience platform can work best for you. A recent survey by TFM Insights found that 44% of businesses struggled to achieve a single view of their customer data. At Kagool, we look at who your customers are and what they get up to on your site. We help you get a single view of your customer data to deliver more influential contextual marketing.
Our UX design team specialise in making every part of your digital presence consistent, but also flexible. We can help make every piece of your website easy to personalise for better contextual marketing.
We’ve also got a host of digital strategists who can help you jazz up your customer experience with Sitecore SEO, email marketing, social media and content marketing. We’ll help you get the most out of the marketing tools within your customer experience platform.
How we use the Sitecore customer experience platform
We work exclusively on Sitecore projects and we’re the largest UK agency to do so. Sitecore’s a powerful customer experience platform designed to deliver a multi-channel digital strategy. The platform is highly rated by Gartner. Plus it’s flexible enough to integrate with any third party systems you may already use.
We’re one of the UK’s leading Sitecore partners with Platinum Implementation Partner status. If you want to know more about how we use the Sitecore customer experience platform to power successful websites, let us give you a free Sitecore demo.
If you’re an existing Sitecore user, talk to us about a Sitecore audit and find out how you can get more from Sitecore.
Sitecore demo
Sitecore demo - Take a fresh look at Sitecore
Take a Sitecore demo to discover how it will help you
To appreciate the features and functionality offered by the world’s leading digital platform take a Sitecore Demo. The latest offering, Sitecore 9, includes a set of tools to make sure your organisation gets the best possible returns from all aspects of digital marketing.
You can manage multiple websites, social media campaigns, email marketing, analytics and personalisation through one easy to use console. The Sitecore demo will guide you through these different options. This will help you make a quick evaluation of the platform's suitability for your business.
The benefits of a Sitecore Demo
Sitecore is ideal for mid tier or enterprise scale businesses with the following attributes:
Multiple locations / territories, brands or multi-lingual requirements
Investments in other software solutions (e.g. CRM, ERP, PIM etc.)
Strong compliance or security considerations
A segmented customer base or you offer a number of different products or services
Aspirations to be a digital market leader
Sitecore was rated by Gartner as the Gartner Magic Quadrant 2017 for its completeness of vision. The release of Sitecore 9 raised the bar even further, adding advanced machine learning and significant platform and performance enhancements.
With Sitecore 9 marketers can collect all customer interactions in one place - The Sitecore Experience Database.
Data collected from all your other customer-facing platforms such as CRM, non-Sitecore websites and customer service team are stored here to give you a true ‘single view’ of your engagement with individual customers.
Sitecore Demo features and functionality
Sitecore 9 includes automated testing and optimisation. The platform recommends content, segments audiences and highlights paths to conversion. Best of all it automatically writes rules to optimise these. All you need to do is review the options and choose which to use.
Sitecore will flag the web pages, social media posts, digital assets or email campaigns that are most effective at moving customers along your sales funnel. The Sitecore demo will change the way you view your digital portfolio.
Sitecore has retained the many benefits that helped it become the number one customer experience platform, which include:
Integration - Excellent integration with other third party software solutions through its native API
Scalability - Great Scalability for rolling out sites to multiple regions and in different languages
Ease of Use - It’s easy to create, manage and control content through the object based content management system
Value - Sitecore pricing makes it affordable for mid-tier as well as larger organisations
As you’ll see in the Sitecore demo there’s an improved user interface that’s incredibly intuitive to use.
Site Core Demo For Ecommerce Application:
Now we are going to install site core based ecommerce web application in our local system.
Download Link: www.github.com/sitecore/sitecore.demo.retail
01. Getting Started
J.F. Larente edited this page on May 18, 2017 · 47 revisions
Important Note
Visual Studio 2015 is required for this solution. Installing Visual Studio 2017 alongside will cause issues with .NET Core dependencies and will prevent the solution from deploying correctly
Prerequisites
Please note the Sitecore Commerce prerequisites on the following page particularly the ASP.NET related prerequisites
Please note the Habitat prerequisites
Installation video
This 15 mins video takes you through the installation process to show you the overall process. Please read through the steps below to understand the detailed process before commencing.
Defaults
We highly recommend changing the default password in the /install-commerce-config.json file as the user will be created with administrative privileges
The automated setup scripts assume the following default settings and locations:
Commerce Server Setup package can be downloaded from here
If you do not want to use the default settings, you need to adjust the appropriate values in the following files:
/src/Project/Retail/code/App_Config/Include/zzz/z.Sitecore.Demo.Retail.DevSettings.config
/gulp-config.js
/publishsettings.targets
/install-commerce-config.json
Some defaults might require changes to Sitecore items and other files. Please refer to the Sitecore and Sitecore Commerce documentation for more information.
Installing the Sitecore Commerce Demo
To install:
Ensure you have the latest version of PowerShell (5.1) installed.
Clone this repository to your local file system in the Commerce Project location above, e.g. c:\projects\Sitecore.Demo.Retail
Clone the Habitat to your local file system under the Habitat Project location above, e.g. c:\projects\Habitat
Install Commerce Server:
From the Sitecore Commerce 8.2.1 download copy CommerceServer-11.4.148.exe to c:\projects\sitecore.demo.retail\Install\
Open a PowerShell prompt with elevated privileges and run .\\install-commerce-server.ps1 in the root of your clone of this repository.
On some systems, the Carbon PowerShell module does not get installed automatically. In that case you can get it from here.
Alternatively:
Open Visual Studio 2015 in Administrator Mode
Open the Visual Studio 2015 Task Runner Explorer pane (View | Other Windows | Task Runner Explorer).
Switch to "Solution 'Sitecore.Demo.Retail'"
Run the "CE-Install-Commerce-Server" task
Install Sitecore
SIM Solution Installation
If you have access to the Sitecore821_Commerce821 SIM Solution, import the Solution using SIM and move on to Step 6
Traditional Installation
Install Sitecore 8.2 update 1 in the Commerce Website location above with IIS bindings for Commerce Site domain and Habitat Site domain
This step can also be done with SIM, when doing so ensure these settings:
Note: To get alignment in database naming, modify advanced setting patternCore/SqlServer/DatabaseNamePattern to be {SqlPrefix}.{DatabaseRole}
Install the following Sitecore Experience Platform packages:
Webforms for Marketers
Email Experience Manager
Install the following Sitecore Commerce 8.2.1 packages (which can be found as part of the Sitecore Commerce 8.2.1 download).
Sitecore Commerce Connect 10.0.174.zip
Sitecore Commerce Server Connect.10.0.70.update
Sitecore.Commerce.Engine.Connect.1.0.2301.update
Sitecore Commerce Business Tools Shared.1.0.100.update
Sitecore Commerce Customer and Order Manager.1.0.51.update
Sitecore Commerce Merchandising Manager.10.0.294.update
Sitecore Commerce Pricing and Promotion Manager.1.0.75.update
Install Habitat using the installation guide in the Habitat Wiki
Install the Sitecore.Demo.Retail Sitecore solution
Open a command prompt on the Commerce Project location above, e.g. c:\projects\Sitecore.Demo.Retail
Run npm install to install the required node.js dependencies
Run gulp to execute the build and deployment script for the Sitecore website
In case the last step, the Unicorn synchronization, fails, go to http://habitat.dev.local/unicorn.aspx?verb=Sync to run the synchronization manually.
Install Commerce Sites
Open a PowerShell prompt with elevated privileges and run .\\install-commerce-sites.ps1 in the root of repository.
Alternatively:
Open Visual Studio 2015 in Administrator Mode
Open the Visual Studio 2015 Task Runner Explorer pane (View | Other Windows | Task Runner Explorer).
Switch to "Solution 'Sitecore.Demo.Retail'"
Run the "CE-Install-Commerce-Sites" task
Re-index the product data
Log into Sitecore on http://retail.dev.local/sitecore
Open the Control Panel and open the Indexing Manager
Rebuild the sitecore_master_index
Visit the site on the Commerce Site domain: http://retail.dev.local.
Restrict rights on the computer for the automatically created user account (default : HabitatRuntimeUser)
We recommend setting Local security policy to Deny log on through Remote Desktop Services and Deny log on locally to the HabitatRuntimeUser.
For a reference storefront solution, please refer to the Sitecore Reference Storefront.
System Requirements:
System requirements
The following are the minimum system requirements for a single server, non-production Sitecore Commerce deployment:
Hardware requirements
Operating system, database, and dependent software
Sitecore software
Note:
The Sitecore Commerce release package includes a sample configuration file (Server2012_FeaturesRequired.txt) to assist you with configuration of the Windows features.
The requirements and dependencies described in this document are, in some cases, more restrictive than those outlined in the Sitecore XP Installation Guide. For example, Sitecore Commerce does not support Windows Home and Education editions.
Install ASP.NET Core and related software
Sitecore Commerce Server 8.2.1 runs on the ASP.NET Core Module.
To install the ASP.NET Core module and related software:
Download and install ASP.NET MVC 4 (available at https://www.asp.net/mvc/mvc4). For more information on MVC, go to Set up Visual Studio to work with Sitecore MVC.
Download and install .NET Core 1.0.3 SDK Preview 2 build 3156.
Download and install .NET Core Windows Server Hosting 1.x.x.
Optionally, download and install .NET Core 1.0.1 Visual Studio 2015 Tooling Preview 2. This is only required for a development environment.
Download and install Microsoft Web Deploy 3.6 (the 64 bit file is available at: WebDeploy_amd64_en-US.msi).
Download and install Microsoft HttpPlatformHandler v1.0 (the 64 bit file is available at httpPlatformHandler_amd64.msi).
Restart the server, or open a command prompt and execute the iisreset command to apply the changes to the system path.
For more information on the ASP.NET Core Module, including module configuration and information on how to set environment variables with the web.config file, how to use the app_offline.htm file to suspend request processing, and how to activate module logging, go to ASP.NET Core Module Configuration Reference.
Sitecore Installation
Installation Process:
Prerequisites:
solr-6.6.2
nssm
Sitecore 9.0.0
Sitecore 9.0.0 rev. 171002 (OnPrem)_xp0xconnect.scwdp.zip
Sitecore 9.0.0 rev. 171002 (OnPrem)_single.scwdp.zip
sitecore-solr.json
sitecore-XP0.json
xconnect-createcert.json
xconnect-solr.json
xconnect-xp0.json
license.xml
solrssl.ps1
.NET Frame work 4.5
IIS 10
MS SQL database 2017
Windows 10.
Powershell version 5 (or above).
Java(Latest JDK) – Prerequisite for SOLR.
1. SOLR installation:
(a) Download the SOLR 6.6.2 (or) above zip using the link http://archive.apache.org/dist/lucene/solr/and extract.
(b) Download NSSM(non sucking service manager) using the link https://nssm.cc/ci/nssm-2.24-101-g897c7ad.zip and extract.
(c) Run “[nssm path]\win64\nssm” install [SolrServicename] command as administrator and -Populate the application path with solr.cmd (SOLR bin folder).
populate startup with the solr-6.6.2 bin folder.
Populate the Arguments with start -f -p [port number].
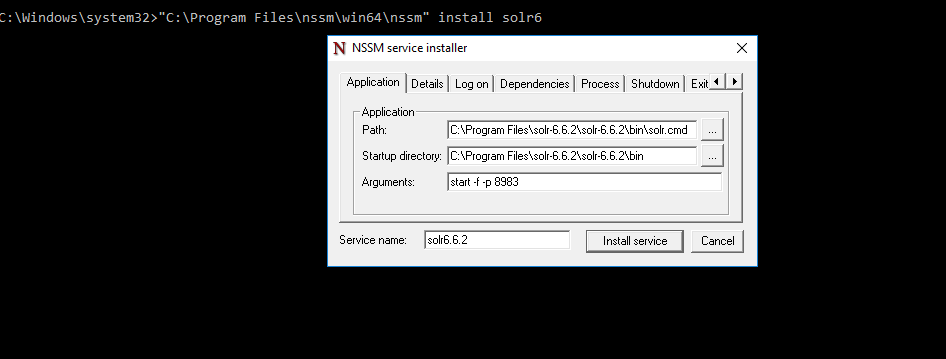
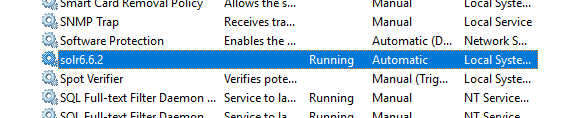
(d) Click on Install to install service SOLR as a service with the desired service name.
5. We have to uncomment below commands in solr bin folder solr.in.cmd file
set SOLR_SSL_KEY_STORE=etc/solr-ssl.keystore.jks
set SOLR_SSL_KEY_STORE_PASSWORD=secret
set SOLR_SSL_KEY_STORE_TYPE=JKS
set SOLR_SSL_TRUST_STORE=etc/solr-ssl.keystore.jks
After that restart the solr service. And add https://localhost:8983
6 .NET Frame work:
Sitecore XP requires .NET Framework 4.5. Any available updates to the .NET Framework should be applied to every Sitecore host
7. MS SQL Database 2017:
Download and install MS Sql database 2017 on your local machine. By default server name “localhost” ,username “sa” and password “admin@123” will come autometically. We can can use this credentials.
8. Power Shell : Make sure our power shell should be verion 5 or higher.
9. IIS : Download IIS 10 and install in our local machine
10. Create one .ps1 file and rename it “solrssl.ps1” and copy below code.
param(
[string]$KeystoreFile = 'solr-ssl.keystore.jks',
[string]$KeystorePassword = 'secret',
[string]$SolrDomain = 'localhost',
[switch]$Clobber
)
$ErrorActionPreference = 'Stop'
### PARAM VALIDATION
if($KeystorePassword -ne 'secret') {
Write-Error 'The keystore password must be "secret", because Solr apparently ignores the parameter'
}
if((Test-Path $KeystoreFile)) {
if($Clobber) {
Write-Host "Removing $KeystoreFile..."
Remove-Item $KeystoreFile
} else {
$KeystorePath = Resolve-Path $KeystoreFile
Write-Error "Keystore file $KeystorePath already existed. To regenerate it, pass -Clobber."
}
}
$P12Path = [IO.Path]::ChangeExtension($KeystoreFile, 'p12')
if((Test-Path $P12Path)) {
if($Clobber) {
Write-Host "Removing $P12Path..."
Remove-Item $P12Path
} else {
$P12Path = Resolve-Path $P12Path
Write-Error "Keystore file $P12Path already existed. To regenerate it, pass -Clobber."
}
}
try {
$keytool = (Get-Command 'C:\Program Files\Java\jre1.8.0_191\bin\keytool.exe').Source
} catch {
$keytool = Read-Host "keytool.exe not on path. Enter path to keytool (found in JRE bin folder)"
if([string]::IsNullOrEmpty($keytool) -or -not (Test-Path $keytool)) {
Write-Error "Keytool path was invalid."
}
}
### DOING STUFF
Write-Host ''
Write-Host 'Generating JKS keystore...'
& $keytool -genkeypair -alias solr-ssl -keyalg RSA -keysize 2048 -keypass $KeystorePassword -storepass $KeystorePassword -validity 9999 -keystore $KeystoreFile -ext SAN=DNS:$SolrDomain,IP:127.0.0.1 -dname "CN=$SolrDomain, OU=Organizational Unit, O=Organization, L=Location, ST=State, C=Country"
Write-Host ''
Write-Host 'Generating .p12 to import to Windows...'
& $keytool -importkeystore -srckeystore $KeystoreFile -destkeystore $P12Path -srcstoretype jks -deststoretype pkcs12 -srcstorepass $KeystorePassword -deststorepass $KeystorePassword
Write-Host ''
Write-Host 'Trusting generated SSL certificate...'
$secureStringKeystorePassword = ConvertTo-SecureString -String $KeystorePassword -Force -AsPlainText
$root = Import-PfxCertificate -FilePath $P12Path -Password $secureStringKeystorePassword -CertStoreLocation Cert:\LocalMachine\Root
Write-Host 'SSL certificate is now locally trusted. (added as root CA)'
Write-Host ''
Write-Host '########## NEXT STEPS ##########' -ForegroundColor Green
Write-Host ''
Write-Host '1. Copy your keystore to $SOLR_HOME\server\etc (MUST be here)' -ForegroundColor Green
if(-not $KeystoreFile.EndsWith('solr-ssl.keystore.jks')) {
Write-Warning 'Your keystore file is not named "solr-ssl.keystore.jks"'
Write-Warning 'Solr requires this exact name, so make sure to rename it before use.'
}
$KeystorePath = Resolve-Path $KeystoreFile
Write-Host ''
Write-Host '2. Add the following lines to your solr.in.cmd:' -ForegroundColor Green
Write-Host ''
Write-Host "set SOLR_SSL_KEY_STORE=etc/solr-ssl.keystore.jks" -ForegroundColor Yellow
Write-Host "set SOLR_SSL_KEY_STORE_PASSWORD=$KeystorePassword" -ForegroundColor Yellow
Write-Host "set SOLR_SSL_TRUST_STORE=etc/solr-ssl.keystore.jks" -ForegroundColor Yellow
Write-Host "set SOLR_SSL_TRUST_STORE_PASSWORD=$KeystorePassword" -ForegroundColor Yellow
Write-Host ''
Write-Host 'Done!'
11. Create one folder in C drive and rename it as “sitecore”.
12. Under sitecore folder create one more folder and rename it as “install”. Under this folder copy all 3rd point files as we mention in first page.
13. Copy nssm folder and solr folder in sitecore folder.
14. Execute the below shell script in power shell as a administrator mode.
#define parameters
$prefix = "sc90"
$PSScriptRoot = "C:\sitecore\install"
$XConnectCollectionService = "$prefix.xconnect"
$sitecoreSiteName = "$prefix.local"
$SolrUrl = "https://localhost:8983/solr"
$SolrRoot = "C:\sitecore\solr-6.6.2"
$SolrService = "solr7"
$SqlServer = "localhost"
$SqlAdminUser = "sa"
$SqlAdminPassword="admin@123"
#install client certificate for xconnect
$certParams = @{
Path = "$PSScriptRoot\xconnect-createcert.json"
CertificateName = "$prefix.xconnect_client"
}
Install-SitecoreConfiguration @certParams -Verbose
#install solr cores for xdb
$solrParams = @{
Path = "$PSScriptRoot\xconnect-solr.json"
SolrUrl = $SolrUrl
SolrRoot = $SolrRoot
SolrService = $SolrService
CorePrefix = $prefix
}
Install-SitecoreConfiguration @solrParams
#deploy xconnect instance
$xconnectParams = @{
Path = "$PSScriptRoot\xconnect-xp0.json"
Package = "$PSScriptRoot\Sitecore 9.0.0 rev. 171002 (OnPrem)_xp0xconnect.scwdp.zip"
LicenseFile = "$PSScriptRoot\license.xml"
Sitename = $XConnectCollectionService
XConnectCert = $certParams.CertificateName
SqlDbPrefix = $prefix
SqlServer = $SqlServer
SqlAdminUser = $SqlAdminUser
SqlAdminPassword = $SqlAdminPassword
SolrCorePrefix = $prefix
SolrURL = $SolrUrl
}
Install-SitecoreConfiguration @xconnectParams
#install solr cores for sitecore
$solrParams = @{
Path = "$PSScriptRoot\sitecore-solr.json"
SolrUrl = $SolrUrl
SolrRoot = $SolrRoot
SolrService = $SolrService
CorePrefix = $prefix
}
Install-SitecoreConfiguration @solrParams
#install sitecore instance
$xconnectHostName = "$prefix.xconnect"
$sitecoreParams = @{
Path = "$PSScriptRoot\sitecore-XP0.json"
Package = "$PSScriptRoot\Sitecore 9.0.0 rev. 171002 (OnPrem)_single.scwdp.zip"
LicenseFile = "$PSScriptRoot\license.xml"
SqlDbPrefix = $prefix
SqlServer = $SqlServer
SqlAdminUser = $SqlAdminUser
SqlAdminPassword = $SqlAdminPassword
SolrCorePrefix = $prefix
SolrUrl = $SolrUrl
XConnectCert = $certParams.CertificateName
Sitename = $sitecoreSiteName
XConnectCollectionService = "https://$XConnectCollectionService"
}
Install-SitecoreConfiguration @sitecoreParams
For installation it will take 30 min above. After installation we can use this url http://sc91.local/sitecore/login
By default username is “admin” and password is “b”.


Comments
Post a Comment